The Ultimate Guide to Getting a Flawless Glow with Milk Skin Tint
Welcome to the world of effortless beauty, where your skin gets to shine through, only better. If you’ve been searching for that perfect “no-makeup makeup” look, you’ve likely heard the buzz around a product that promises lightweight coverage and a radiant finish. We’re talking about milk skin tint, a game-changer in the beauty industry that bridges the gap between skincare and makeup. This guide will walk you through everything you need to know to achieve a flawless, natural glow.
Key Takeaways
- What It Is: A milk skin tint is a sheer, lightweight coverage product designed to even out your skin tone while providing a dewy, natural finish. It’s less heavy than a traditional foundation.
- Best For: It’s ideal for those who prefer a minimalist makeup routine and want a breathable, skin-like feel.
- Application is Key: Applying with your fingers often yields the most natural finish, but sponges and brushes work well for a more polished look.
- Shade Matching: Understanding your skin’s undertone (cool, warm, or neutral) is crucial for finding the perfect match.
- Versatility: A milk skin tint can be used on its own for a fresh-faced look or as a base for other makeup products like concealer and blush.
What Exactly Is a Milk Skin Tint?
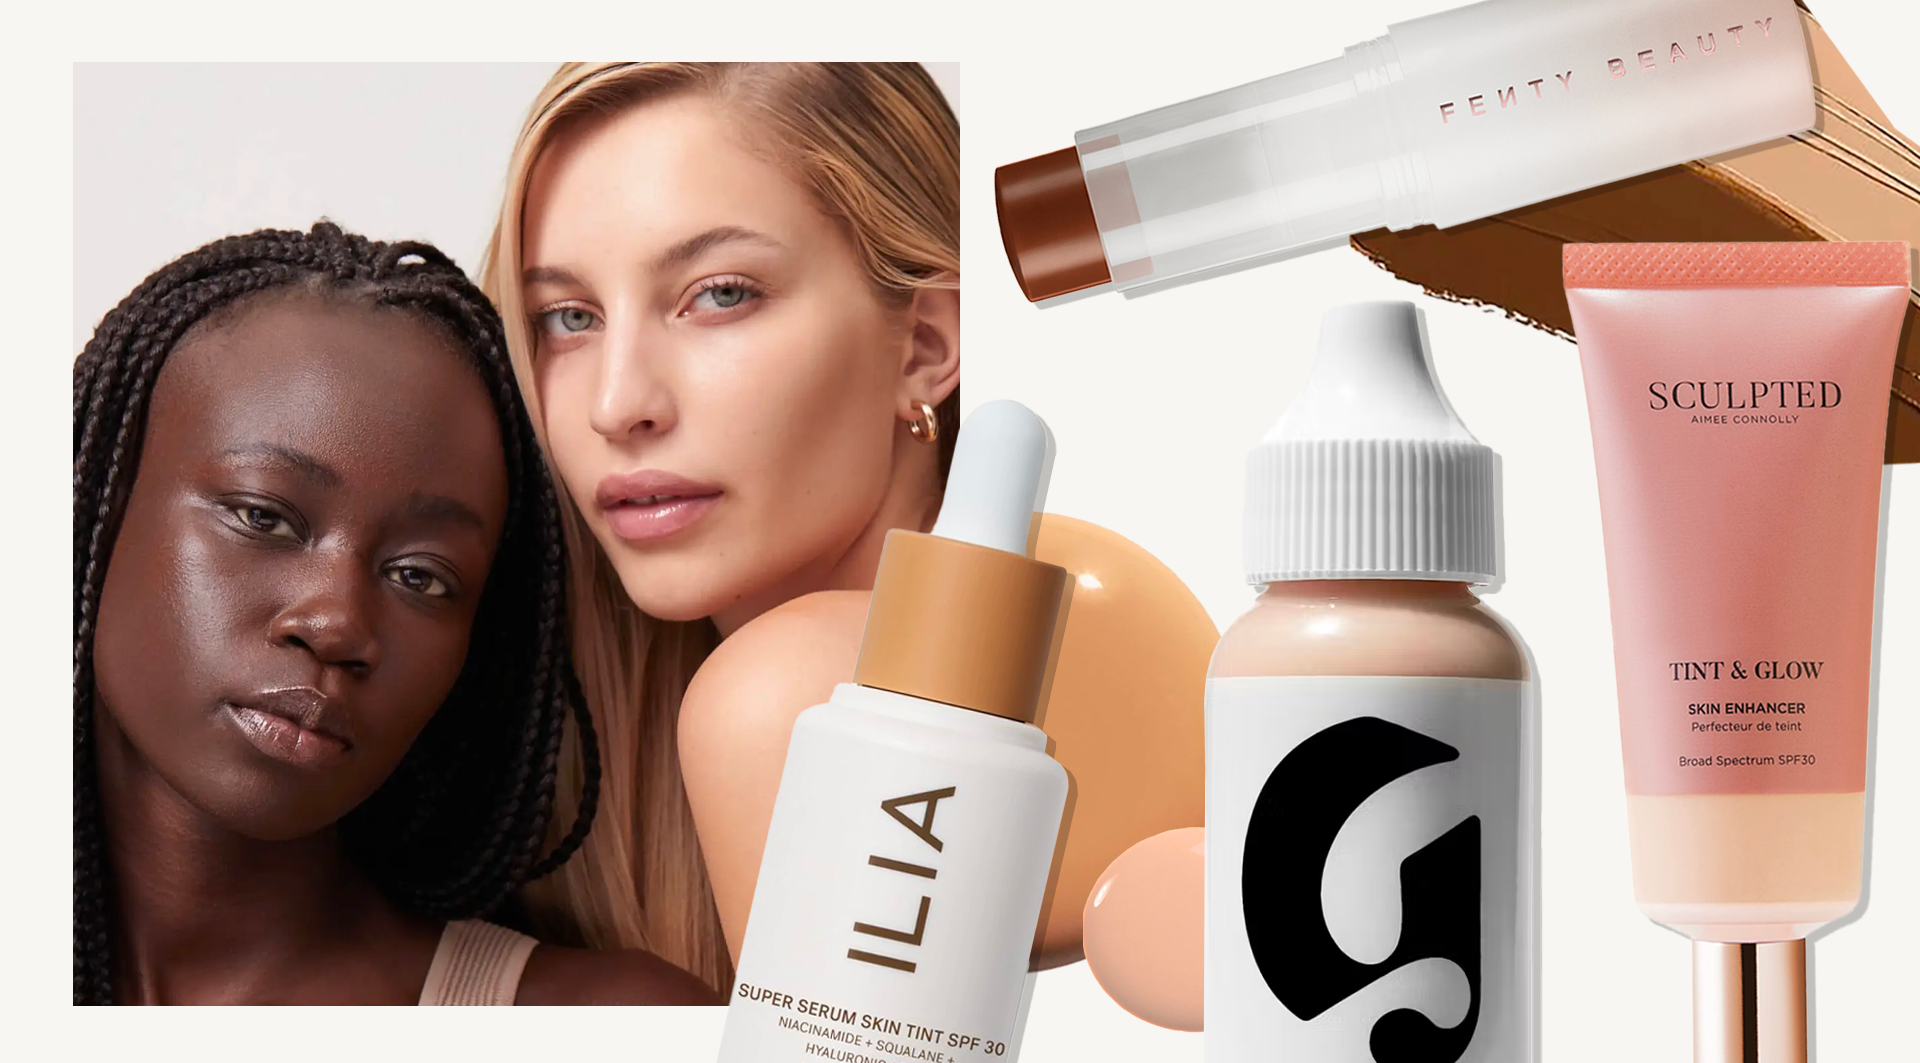
Let’s break it down. A milk skin tint is a type of lightweight, sheer-coverage makeup. Think of it as a whisper of color for your face. Unlike heavy foundations that aim to create a flawless, uniform canvas, a milk skin tint is designed to enhance your natural skin, not hide it. Its primary job is to gently even out skin tone, reduce the appearance of minor redness or discoloration, and impart a healthy, dewy glow.
The “milk” in the name often alludes to its fluid, milky texture and its typically nourishing, skin-loving ingredients. These formulas are usually very liquidy and spread easily, melting into the skin for a seamless finish. They feel incredibly lightweight, almost as if you’re wearing nothing at all. This makes them a fantastic choice for daily wear, especially on days when you want a little something to look polished without the feel of a full face of makeup. The goal is to achieve a look that says “I just have great skin,” rather than “I’m wearing great makeup.”
The Core Benefits: Why Choose a Milk Skin Tint?
The rising popularity of milk skin tint isn’t just a fleeting trend; it’s rooted in tangible benefits that align with modern beauty ideals. People are increasingly drawn to products that celebrate, rather than cover, their natural skin.
- Lightweight & Breathable: One of the most significant advantages is its barely-there feel. Heavy foundations can feel suffocating, especially in warm weather or during long days. A milk skin tint allows your skin to breathe, making it comfortable for all-day wear.
- Natural, Dewy Finish: This product is the master of the “glass skin” or “glowy” look. It typically contains light-reflecting particles or hydrating ingredients that leave your skin looking luminous and healthy, not flat or matte.
- Evens Skin Tone Subtly: It won’t cover major blemishes or dark spots completely, but it does a fantastic job of blurring imperfections and evening out redness. The result is a more uniform, yet still authentic, complexion.
- Skincare-Infused Formulas: Many milk skin tints are packed with beneficial skincare ingredients like hyaluronic acid for hydration, squalane for moisture, and various plant extracts for antioxidant benefits. This hybrid nature means you’re treating your skin while you wear it.
Milk Skin Tint vs. Other Base Products
With so many options on the market, it can be confusing to know which base product is right for you. How does a milk skin tint stack up against foundations, BB creams, and tinted moisturizers? Each serves a different purpose, and choosing the right one depends on your desired coverage and finish.
While they all offer some level of color, the primary differences lie in their texture, coverage level, and intended skincare benefits. A milk skin tint is the sheerest of the bunch, focused on a dewy, skin-like finish. Foundations offer the most coverage, while BB and CC creams sit in the middle, often providing additional benefits like SPF and color correction.
|
Product Type |
Coverage Level |
Finish |
Primary Purpose |
Best For |
|---|---|---|---|---|
|
Milk Skin Tint |
Sheer |
Dewy, Natural |
Enhance natural skin, even tone |
Minimalist makeup, “no-makeup” look |
|
Tinted Moisturizer |
Sheer to Light |
Natural, often dewy |
Hydration with a hint of color |
Dry skin, casual daily wear |
|
BB Cream |
Light to Medium |
Natural or Matte |
All-in-one: primes, moisturizes, covers |
Streamlining a routine, added benefits |
|
CC Cream |
Light to Medium |
Natural or Matte |
Color correcting redness or sallowness |
Uneven skin tone, redness |
|
Foundation |
Medium to Full |
Varies (Matte, Satin, Dewy) |
Covering imperfections, creating a canvas |
Events, photos, customizable coverage |
Finding Your Perfect Shade and Undertone
Choosing the right shade is the most critical step to ensuring your milk skin tint looks like a second skin. Because the formula is sheer, there’s a bit more flexibility than with a full-coverage foundation. However, getting the undertone right is still essential to avoid looking ashy or orange.
Step 1: Identify Your Undertone
Your undertone is the subtle, underlying color of your skin. It doesn’t change with sun exposure. There are three main types:
- Cool: Your skin has hints of pink, red, or blue. The veins on your wrist may look blue. You tend to burn easily in the sun.
- Warm: Your skin has hints of yellow, golden, or peach. The veins on your wrist may look green. You tend to tan easily.
- Neutral: You have a mix of both cool and warm tones, or your undertone is not obvious. Your veins may appear blue-green.
Step 2: Swatch and Test
The best way to find your match is to swatch. Apply small stripes of a few potential shades on your jawline, not your hand or arm, as the skin color there can be different. Let the swatches sit for a few minutes to see if they oxidize (change color). The right shade will seem to disappear into your skin. Test in natural daylight if possible, as store lighting can be deceptive.
Checklist for Choosing Your Milk Skin Tint
- Determine your skin undertone (cool, warm, neutral).
- Identify your skin type (oily, dry, combo, sensitive).
- Decide on your desired finish (dewy, natural).
- Swatch 3 potential shades on your jawline.
- Check the swatches in natural light after a few minutes.
- Read reviews for the product, focusing on comments from people with a similar skin type and tone.
- Check the ingredient list for any known irritants or for beneficial skincare ingredients you want.
How to Apply Milk Skin Tint for a Seamless Finish
Application method can dramatically change the final look of your milk skin tint. The goal is a seamless, melted-in effect. Here are the most popular methods and the results you can expect from each.
Method 1: Using Your Fingers
This is often the best method for a true skin-like finish.
- Prep Your Skin: Start with a clean, moisturized face. Allow your moisturizer and sunscreen to absorb for a few minutes.
- Dispense Product: Squeeze a small amount onto your fingertips.
- Warm It Up: Rub your fingertips together to warm the product. This helps it melt into the skin more effectively.
- Dot and Blend: Dot the tint onto the center of your face—forehead, nose, cheeks, and chin—and blend outwards. Use gentle patting and sweeping motions. The warmth from your fingers provides the most natural, seamless application.
Method 2: Using a Damp Makeup Sponge
This method gives a sheer, airbrushed glow and can build light coverage.
- Dampen the Sponge: Run your sponge under water and squeeze it out until it’s just damp, not soaking wet.
- Apply Product: Dispense the milk skin tint onto the back of your hand.
- Pick Up and Bounce: Dip the damp sponge into the product and apply it to your face using light, bouncing or stippling motions. This technique presses the product into the skin for a flawless, non-streaky finish.
Method 3: Using a Foundation Brush
This method offers a bit more control and slightly more coverage.
- Choose the Right Brush: A dense, flat-top kabuki brush or a stippling brush works best.
- Apply to Face: Dot the tint directly onto your face or apply it with the brush.
- Buff or Stipple: Use circular buffing motions for an even, polished look. Alternatively, use stippling (patting) motions to press the product into the skin, which can offer slightly more coverage in targeted areas.
Tailoring Milk Skin Tint to Your Skin Type
A milk skin tint can work for almost any skin type, but you may need to adjust your prep and application to get the best results.
For Oily Skin
If you have oily skin, the dewy finish of a milk skin tint might seem intimidating. The key is proper skin prep. Start with a mattifying or oil-control primer. After applying the tint, set your T-zone (forehead, nose, and chin) with a light dusting of translucent powder. This will help control shine throughout the day while keeping the radiant glow on the high points of your face.
For Dry Skin
Dry skin and milk skin tints are a match made in heaven. The hydrating formulas and dewy finish will make your skin look plump and luminous. To maximize the effect, prep your skin with a rich moisturizer and a hydrating primer. You can even add a drop of facial oil to your milk skin tint for an extra boost of moisture and glow.
For Combination Skin
For combination skin, a targeted approach is best. Use a mattifying primer on your oily T-zone and a hydrating primer on your drier cheeks. Apply the milk skin tint all over, and then selectively set the oily areas with powder. This hybrid technique ensures every part of your face looks its best.
For Sensitive and Acne-Prone Skin
Many milk skin tints are formulated to be gentle and non-comedogenic (meaning they won’t clog pores). Look for formulas free from common irritants like fragrance and alcohol. Always patch-test a new product on a small area of your skin before applying it to your entire face. If you have active breakouts, a milk skin tint will not provide heavy coverage, but it will help even out surrounding redness without aggravating the skin.
For Mature Skin
Mature skin benefits greatly from the lightweight, hydrating nature of a milk skin tint. Heavy foundations can settle into fine lines and wrinkles, emphasizing them. The sheer, luminous formula of a tint, however, glides over texture and imparts a youthful glow. Look for tints with ingredients like hyaluronic acid and antioxidants.
Pairing and Layering: Building Your Look
A milk skin tint is the perfect base for a minimalist or a full-glam look. It layers beautifully with other products.
Pairing with Concealer, Blush, and More
- Concealer: Since a milk skin tint offers sheer coverage, you’ll likely want to use a concealer for under-eye circles or blemishes. Apply the tint first, then dot concealer only where you need it. Choose a creamy, hydrating concealer that blends well with the dewy finish.
- Blush and Bronzer: Cream and liquid blushes or bronzers are ideal partners for a milk skin tint. They blend seamlessly into the dewy base and enhance the natural, radiant look. Apply with your fingers or a sponge and blend well.
- Setting Products: If you have oily skin or want your makeup to last all day, a setting product is a good idea. A light dusting of translucent powder in strategic areas or a few spritzes of a setting spray will lock everything in place without masking the glow. Choose a radiant-finish setting spray to amplify the dewy effect.
Layering with Skincare and Sunscreen
Proper layering is crucial. Your routine should go from the thinnest to the thickest product.
- Skincare: Cleanser, toner, serum, moisturizer. Let each layer absorb fully.
- Sunscreen: This is a non-negotiable step. Apply a broad-spectrum sunscreen with at least SPF 30 and let it set for 5–10 minutes. Sunscreen should always be your last skincare step and your first protective layer before makeup.
- Milk Skin Tint: Apply your milk skin tint on top of your sunscreen.
A note on SPF in makeup: While some milk skin tints contain SPF, it’s usually not enough to provide adequate protection on its own. You would need to apply a very thick layer to get the labeled SPF value. Always use a dedicated sunscreen underneath.
Making Your Milk Skin Tint Last All Day
While they are known for their lightweight nature, there are ways to improve the longevity of your milk skin tint.
- Primer is Your Friend: Using a primer creates a smooth base for the tint to adhere to and can significantly extend its wear time. Choose one based on your skin type—hydrating, mattifying, or pore-filling.
- Set Strategically: As mentioned, setting with powder or spray is key. For a really long-lasting look, try the “sandwich” method: apply a light layer of setting spray after your primer, apply your milk skin tint, and then set again with spray.
- Blot, Don’t Wipe: If you get shiny during the day, use blotting papers to absorb excess oil without disturbing your makeup. Gently press the paper onto the oily area.
Day-to-Night and Seasonal Transitions
A milk skin tint is incredibly versatile. For a daytime look, wear it alone with a bit of mascara and lip balm. To transition to night, you don’t need to start over. Simply build upon your base. Add a touch more concealer, apply a bolder blush, define your eyes with eyeliner, and swipe on a statement lipstick. The dewy base will provide a beautiful canvas for more dramatic evening makeup.
For summer, its lightweight feel is perfect for hot, humid days. In winter, when skin can become dry and dull, the hydrating properties and luminous finish of a milk skin tint will bring life back to your complexion.
Common Mistakes and How to Troubleshoot Them
Even with a user-friendly product like milk skin tint, a few common issues can arise. Here’s how to fix them.
- Problem: It looks streaky or patchy.
-
- Solution: Your skin might be too dry, or your application method needs a tweak. Ensure your skin is well-moisturized before application. Try warming the product with your fingers and pressing it into the skin instead of rubbing. A damp sponge can also help achieve a smoother blend.
- Problem: It looks too shiny or greasy.
-
- Solution: This is common for those with oily skin. Use a mattifying primer beforehand and set your T-zone with translucent powder. Also, ensure you aren’t using an overly rich moisturizer underneath.
- Problem: The color looks off.
-
- Solution: You may have chosen the wrong undertone. Re-evaluate your skin’s undertone and test shades on your jawline in natural light. Since the coverage is sheer, as we’ve discussed on https://versaillesblog.com/, there is some room for error, but the right undertone makes all the difference.
The Push for Inclusivity and Clean Beauty
The beauty industry has made significant strides in offering more inclusive shade ranges, and the milk skin tint category is no exception. Many brands are launching with an extensive range of shades and undertones to ensure everyone can find their perfect match. When shopping, look for brands that champion diversity and showcase their products on a wide variety of skin tones.
Additionally, many milk skin tints align with the “clean beauty” movement. This often means they are formulated without certain ingredients like parabens, sulfates, and phthalates. Many are also vegan and cruelty-free. If these values are important to you, check the product’s description and ingredient list for these credentials.
Compliance Note: Always perform a patch test when trying a new product, especially if you have sensitive skin. If you have persistent skin concerns, it is always best to consult with a board-certified dermatologist.
Conclusion
The milk skin tint has firmly established its place as a staple for modern, effortless beauty. It offers the perfect solution for anyone seeking to enhance their natural skin with a lightweight, breathable product that delivers a healthy, radiant glow. By understanding your skin type, finding your perfect shade, and mastering a few simple application techniques, you can unlock a fresh, flawless complexion that looks and feels like your own skin, but better. It’s more than just makeup; it’s a celebration of you.
Frequently Asked Questions (FAQ)
1. Can I use milk skin tint to cover acne or dark spots?
A milk skin tint provides sheer coverage, so it will not completely cover significant acne or dark spots. It will help to reduce redness and even out the overall skin tone, but for more coverage, you should pair it with a concealer applied to specific areas after the tint.
2. Is a milk skin tint suitable for all ages?
Yes, it is incredibly versatile and suitable for all ages. For younger skin, it offers a natural, fresh-faced look. For mature skin, its lightweight and hydrating formula is often more flattering than heavy foundation, as it doesn’t settle into fine lines and provides a youthful, dewy glow.
3. Do I need to wear sunscreen with a milk skin tint that has SPF?
Yes, you should always wear a separate, dedicated sunscreen underneath. To get the SPF protection listed on the bottle of a makeup product, you would need to apply a much thicker layer than you normally would for a natural finish. A broad-spectrum sunscreen with SPF 30 or higher is essential for proper sun protection.
4. How do I keep my milk skin tint from looking too dewy or oily?
If you have oily or combination skin, prep is key. Use a mattifying primer on your T-zone or any areas that tend to get shiny. After applying the milk skin tint, set those same areas with a light dusting of translucent setting powder. This will control shine without sacrificing the overall radiant finish.
5. What is the difference between a milk skin tint and a tinted moisturizer?
They are very similar, but a milk skin tint is generally even more lightweight and has a more fluid, serum-like texture than a tinted moisturizer. Tints focus on providing a sheer veil of color with a dewy finish, while tinted moisturizers prioritize hydration with a hint of color, and their texture can be slightly creamier.
6. How do I choose the right shade of milk skin tint online?
Many brands offer online shade-matching tools, including quizzes or photo uploads. Look for swatches on models with skin tones similar to yours. Reading reviews and watching video tutorials can also be very helpful. When in doubt, it’s often better to go with a shade that is slightly lighter, as the sheer formula is forgiving and can be warmed up with bronzer.
7. Can I layer milk skin tint for more coverage?
You can build up the coverage slightly by applying a second thin layer, but a milk skin tint is not designed to be a medium or full-coverage product. If you layer too much, you may lose the natural, skin-like finish. For more coverage, it is better to spot-conceal with a separate concealer.


Post Comment